
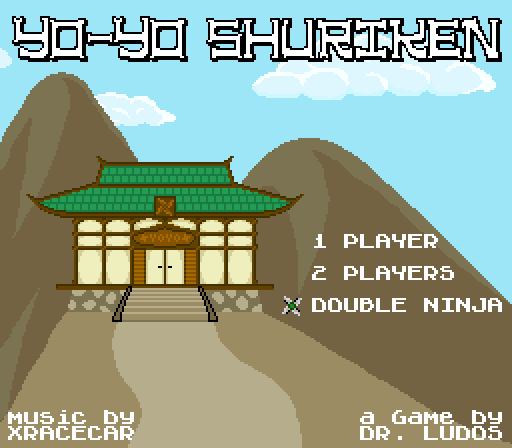
Yo-Yo Shuriken
Making a SNES game in 2020
Making new games for retro consoles is something that amateur developers can do quite easily thanks to today's technology. Last year, I released a new game for my favorite console: the Super Nintendo (SNES). The project went as far as an actual physical release, with a cartridge and a cardboard box like the 90's. In this article, I'll present you the numerous steps of this incredible journey: designing the game, overcoming SNES-related technical issues while programming it, manufacturing new SNES cartridges, and creating the manual and box.
The game : Yo-Yo Shuriken
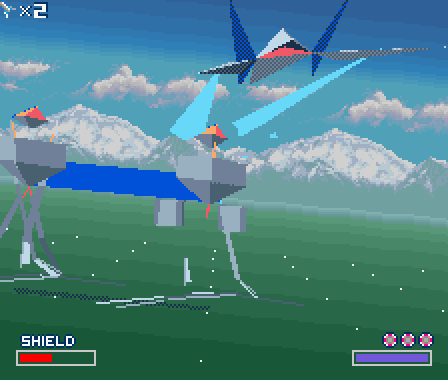
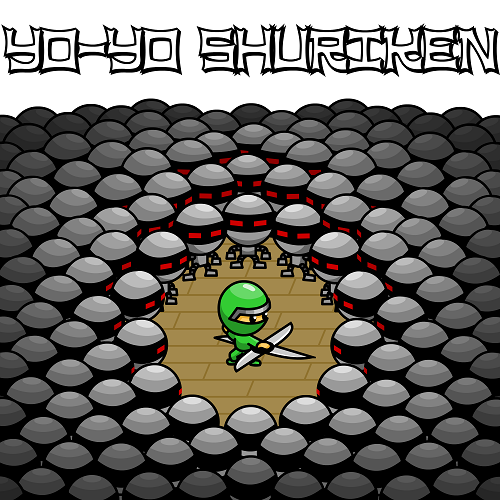
Yo-Yo Shuriken is a fast-paced arcade game for 1 or 2 players on Super Nintendo (SNES).
The core gameplay revolves around shooting a single shuriken that you can magically recall at any time, so you can hit enemies from the front or from behind! You can even focus energy into the shuriken to deliver a powerful charged attack that can cut through several enemies at once.
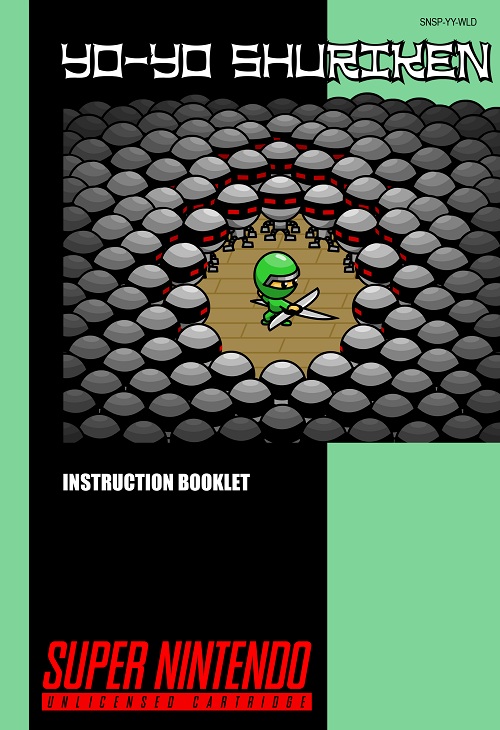
The game is available on cartridge with a beautiful cardboard box and a manual from Catskull Games:
https://catskullgames.com/yo-yo-shuriken
And if you prefer to play it on emulators, you can also get the ROM of the game here:
https://drludos.itch.io/yo-yo-shuriken
Now that you are more familiar with the game itself, let's explore how it was designed.
Designing the game
Making Yo-Yo Shuriken was quite an organic process. I tested gameplay ideas as I came up with them, and tried to refine them until I had a "fun" game in hand. Let's start with the initial idea. For a long time, I wanted to make a shooting game with a single bullet. So the player must retrieve it each time he shoots. Besides the "one bullet" idea, I also wanted to make a game that could be enjoyed with a friend, in co-op. With both ideas in mind, I created the game step-by-step. Each major progress I made was labelled as a new "version" and playtested heavily. If the current version was good, I continued to add new features. Else, I kept working on the current features until the game was fun to play again before adding anything new. Here is a rundown of the major game prototypes, with screenshots. If you want to play the actual ROMs of these prototypes, they are one of the many perks available to my Patreon supporters.
1) Cyber Ninja - version 1
The first thing to do when making a game on a platform you don't know is to display something onscreen! So I drew a robotic ninja sprite and tried to have the SNES to display it onscreen. When it worked, I added code to make the sprite moves with the D-Pad. And then I made a walking animation when the sprite moved. These firsts steps may look simple. But remember that it was my first time making a game for the SNES! So it actually took quite some time to do, as I was learning how the machine worked while making the game. As the current project only displayed a robotic ninja, I named it "Cyber Ninja."
2) Cyber Ninja - version 2
The actual player sprite, a ninja, appeared in this second version. So the robot sprites naturally became their enemies, as everyone know that ninja and robots hate each other! As a proud ninja, the player can throw a single shuriken. The shuriken can get stuck on the screen border, and the player must pick it up to be able to shoot again. The robot enemies can move aimlessly on screen, but no collision detection is performed yet.
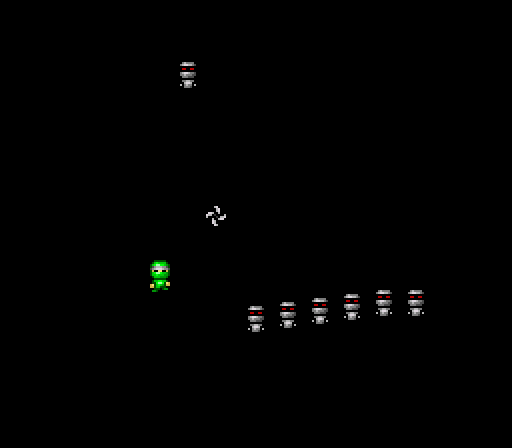
3) Yo-Yo Shuriken - version 1
After several tests, I thought that the shuriken could come back to the ninja automatically when the player pressed the button a second time. I had a lot of fun while testing this mechanic, so it became the core of the whole game! I also changed the project title to reflect this evolution: say goodbye to "Cyber Ninja", and welcome to "Yo-Yo Shuriken"! Indeed, in the game the shuriken goes back-and-forth, much like a yo-yo.
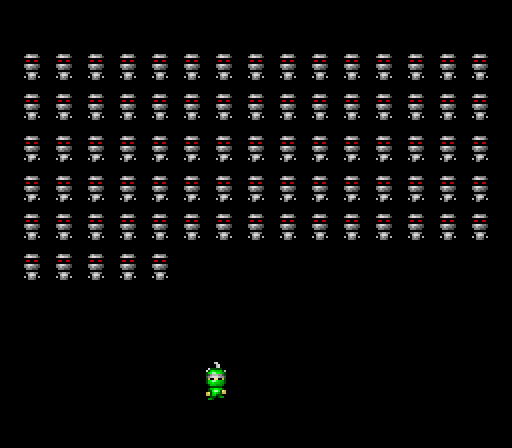
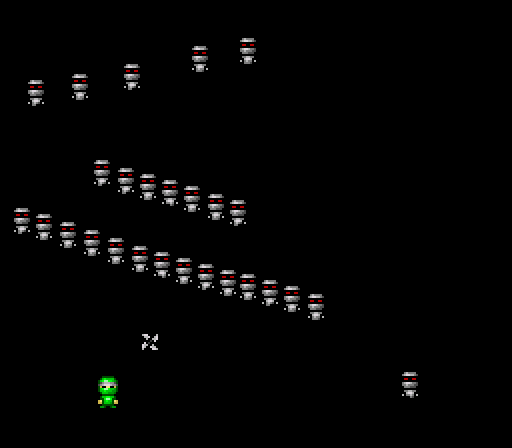
I also added collisions detection. Now the robots disappear when the shuriken hits them. But if a robot hits the player, he's the one who disappear. While everything is still in a very basic state, the core gameplay of the game is almost complete in this third game prototype. So I decided to "stress test" the engine to see how far I could push it before the game lags. I managed to have up to 80 enemies walking and interacting on screen. Remember that a SNES can display a grand total of 128 sprites, so having 80 of them updated 60 times per second with collisions and animations is some kind of achievement.
4) Yo-Yo Shuriken - version 2
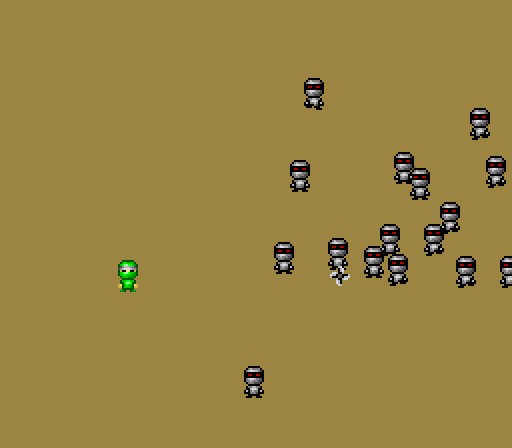
In this fourth version, the enemies are no longer limited to straight line movements. They can now move in several directions. They also bounce off the screen borders to avoid exiting the game area. The game became more interesting as a result.
5) Yo-Yo Shuriken - version 3
I added a different background color, and a system to spawn enemies endlessly. In the previous version, once the 80 robots were destroyed, the game was empty. Here an endless army of robots is generated! The enemies can also follow the player, to force him to keep moving. Indeed, in this fifth version, the game became quickly boring if the player remained static.
6) Yo-Yo Shuriken - version 4
In this version, I faced my first big technical difficulty: displaying large explosion sprites whenever a robot dies. I chose to have quite small player and enemies sprites : 16x16 pixels. That way, I could display loads of them on screen while keeping enough empty space for the player to move around and avoid hitting enemies (the SNES screen resolution is 256x224 pixels). However, I decided to draw my explosions at larger size: 32x32 pixels. The Super Nintendo is capable of displaying two different sprites size at the same time. The developer can choose a "small" and a "large" sprite size from a short list of sizes (8x8, 16x16, 32x32 and 64x64) and the console will use this information when accessing the video ram to display the sprite data onscreen. This is one of the many graphical features that make game developers' life easier. But as any technical feature, it can become daunting when you don't know how to use it!

In my case, in this current prototype, I was only able to display a small portion of the explosion sprites, no matter what I did. The issue was actually quite simple: I wasn't uploading the sprite data where needed in the SNES video memory. So the machine couldn't read them back. I did find the solution after spending several hours on the wonderful documentations made by the homebrew community over the years. I thank them a lot for their hard work on creating and sharing all this precious knowledge: without them, amateurs like me wouldn't be able to make SNES games!
7) Yo-Yo Shuriken - version 5
This prototype marks the addition of another key feature: the two players co-op mode!
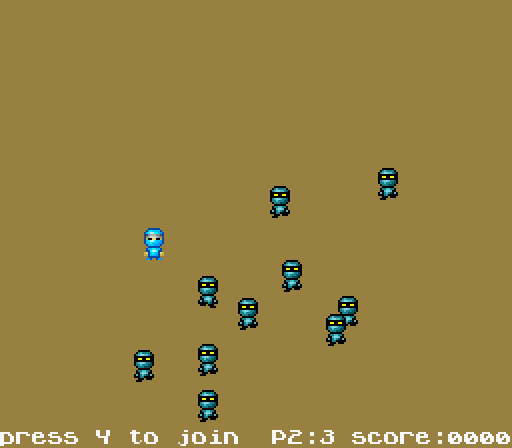
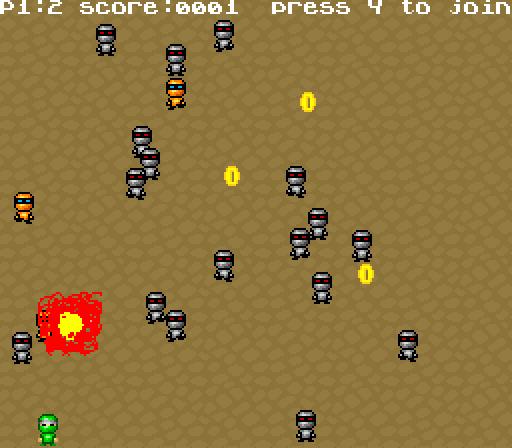
New kinds of enemies join the fray too: the orange robots can take several hits before exploding, and the blue robots can chase the player anywhere. I also added coins that you have to collect to score points. This mecanic greatly improves the gameplay. Indeed, the only way to score points is to collect coins. Killing robots doesn't bring you any "reward" per se, it's just a way to prevent your avatar from dying. The robots drop coins when they die. But the coins disappear after a few seconds. And there are always loads of robots on screen, that will kill you instantly when touched. To earn points, player must thus take a lot of risks and move among the robots, else he won't be able to make a high score. But sometimes, it's better to let some coins disappear to avoid losing a life. This is what game designers call a "risk / reward" choice, and it's a great way to make a game interesting. Here, this mecanic allows Yo-Yo Shuriken to offer a smooth difficulty progression to players. Usually, a rookie player will tend to stay static, and will solely focus on destroying the robots. He won't get points, but he will be able to continue through the game and defeat the final boss. Once a player starts to get more confident, he'll be able to collect coins to make a highscore. And of course, experienced players can try to make a "perfect run" by collecting all the coins, although it means taking an insane amount of risks!
8) Yo-Yo Shuriken - version 6
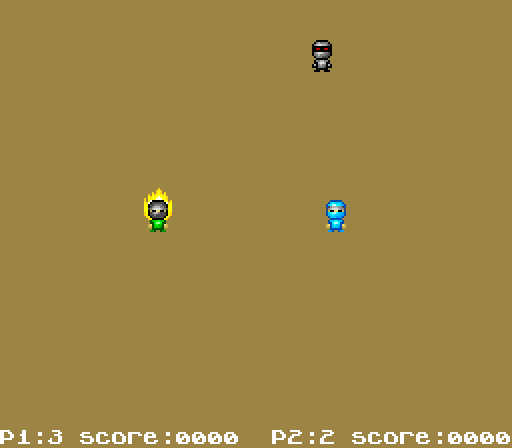
As playtesting went on, I realized that the game was becoming quite repetitive. I tested several ideas to solve this issue. The one I found the most interesting was to hold down the shoot button to "charge" your shuriken. When you release the button, it triggers a "super shot" that can cut through several enemies. This mecanic brings a bit of strategic thinking to the game. Now, the player can choose to perform several simple shots to kill the enemies one by one. Or he can choose to perform a charged shot to kill several enemies at once. But then he'll be vulnerable while the super shot is charging.
9) Yo-Yo Shuriken - version 7
Starting with this version, all the game mecanics that defines the core gameplay were in. So the project entered the longest and most tedious phase: adding content and polishing the game. First, I added sound effects, that I created with BFXR. I also included the wonderful music tracks composed by XRACECAR. I also modified the game GUI and moved it to the top of the screen.
Regarding graphics, I added a pattern to the game background. As my artistic skills are limited, I had an hard time drawing a convincing background. I made several attempts, including this one, before settling on a "wood planks floor" to emphasize that the game takes place inside a dojo (see next version).
Last but not least, I started to create the various game levels. Each level is composed by several enemies waves, with increasing strength and numbers. I spent an insane amount of time testing and balancing those enemies waves to make the game entertaining. Each game designer does this his own way. Personally, for an arcade game, I like to mix intense and challenging moments with easier moments so the player can catch his breath. For example if the player manage to pass a moment with fast moving robots chasing him while the dojo is already filled with slow moving enemies, I'll reward him with a slower-paced moment. Like 4-5 basic enemies moving very slowly so you can easily kill them and collect their coins.
On a side note, you may notice that the explosions graphics are still particularly hideous at this stage.
10) Yo-Yo Shuriken - version 8
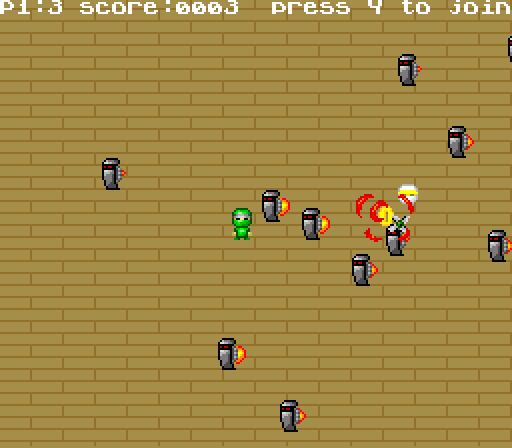
In this version, a new type of enemy joined the fray: the "shield" robot. They can only be hit from behind. The "yo-yo shuriken" mecanic becomes even more meaningful here. Indeed, the best way to kill shield robots is to shoot around them first. Then, you'll have to call the shuriken back and to try to hit them by controlling its return trajectory. I also made new explosions sprites, and the background image is better looking. I even added an invincibility bonus pickup (a white ninja head, replaced by a star in the final game).
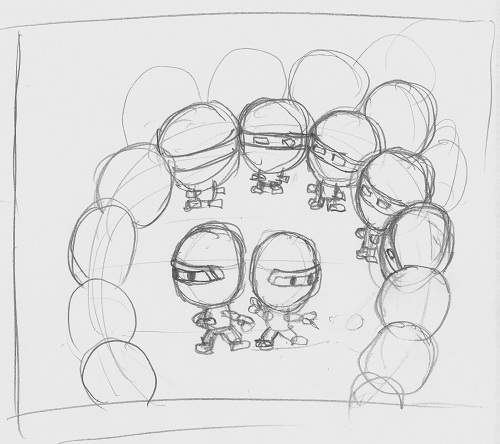
11) Yo-Yo Shuriken - version 9
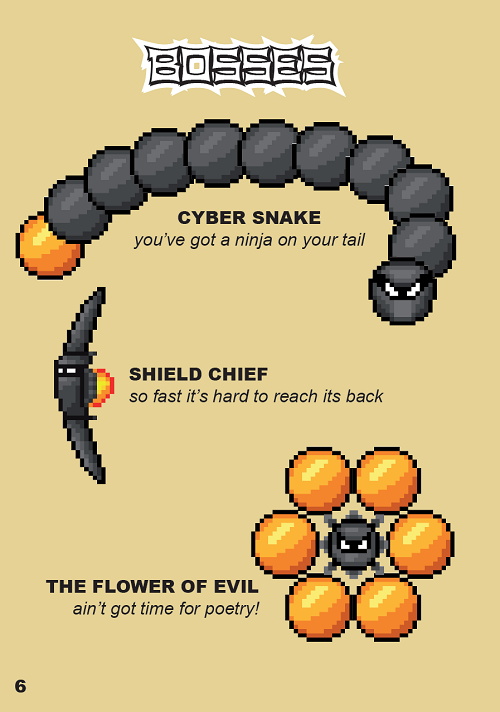
The last major feature arrived in this version: the game bosses. I spend a lot time designing and testing numerous bosses. This was one of the most enjoyable part of the game development process!
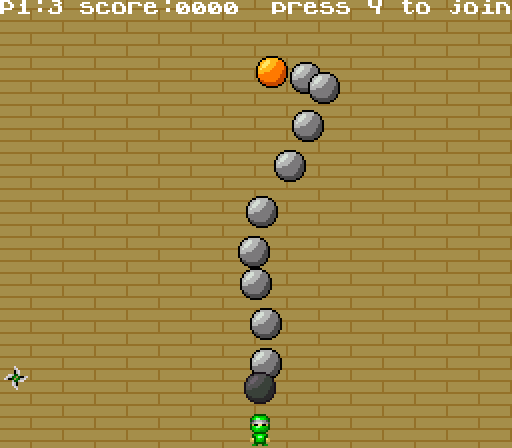
In the screenshots, you can see a prototype of the "snake" boss, and a boss not present in the final version: the tank. The tank boss must be destroyed in several steps. It has several weak points (the orange balls) that have to be hit one after the other. Once a weak point is destroyed, it removes part of the tanks structure, exposing new weak points. This was a challenging boss. For example, one weak point is at the end of a tunnel, so it requires a very precise aiming.
On paper, this boss idea was quite interesting. It took me quite several days to program it. But after many play sessions, I decided to removed it from the game as it was boring. Indeed, it was sometimes quite hard to destroy the boss because of its huge size. Also, if the boss managed to block you into a corner, you were dead as you couldn't hit any of its weak points. In the end, facing this boss was a more frustrating than fun experience. As you can see, even in amateur game projects, sometimes you have to cut disappointing content despite the time you spent making it!
12) Yo-Yo Shuriken - version 10
The key word of this final version was "polish." I added the title screen, the introduction and ending animations, and a screen to explain how the game plays. The final touch was to include a hidden bonus mode: the "double ninja" mode, where you can control two ninjas with a single controller. To unlock this mode, you simply need to finish the game once (or use a cheat code!).
So, after more that one year of development and 5491 lines of code, Yo-Yo Shuriken was finally completed! The game ROM works perfectly. It was tested on several versions of the original game console (Japanese Super Famicom, US Super NES, PAL Super Nintendo); on modern versions (PAL modded with the 50/60hz kit from FFVIMan, Analogue Super NT); and on many emulators (Higan/BSNES, SNES9X, ZSNES, No$SNS, RetroArch, etc.) for various platforms (PC, smartphone, PSP, Raspberry Pi, etc.).
Once the game software final version was validated (all bugs fixed after an extensive beta testing phase), the hardware part of the project could begin. In other word, we needed to make the game available on actual cartridges with a beautiful cardboard box! But before exploring that part of the process, I'd like to give you more details on developing this game for a SNES.
Programming the game
Making games on retro platforms comes with a lot of technical constraints. Using modern tools does simplify the task compared to what the developers from the 90's faced. But you still have many constraints related to the limited specifications of the hardware. Like all the other homebrew developers, I struggled with these limitations while making Yo-Yo Shuriken. Here are the tools I used and the main issues I faced. I hope they'll help you figure how the SNES works under the hood.
Tools of the trade
Back in the 90's, game programmers had to learn and use assembly for each machine they were working on. The SNES was a difficult machine to work on because you had to learn not one, but two assembly languages: The 65816 assembly for the CPU, and the SPC700 assembly for the audio chip.
Nowadays, you can still use assembly, and it's actually the only route to get the most power from any retro machine. But you can also make some really cool games with easier to learn languages, like C or Basic. For the SNES, you have only one C compiler available: tcc816. It's far from perfect, as you have to use some python script to optimize / fix bugs in the code it outputs, but it works. A talented coder named Alekmaul took this compiler and built a full framework to ease the creation of games: the PVSNESlib.
I used this library to make Yo-Yo Shuriken, so I could code it in C language. For graphics, I drew BMP images that were converted to the SNES graphics format. For audio the framework accepted wav files for sound effects and .it files (Impulse Tacker format) for music. It was still quite a challenge to make a game running on the SNES, but PVSNESlib made it a "hard but fun challenge"!
How does a SNES works anyway?
Compared to other machines like the Mega Drive / Genesis or the PC-Engine / TurboGrafx16, the SNES is quite a complex machine, with a lot of different graphics modes. But it's general workflow is actually quite simple. Basically, a SNES can display graphics data using two channels: the "background" and the "sprites". The background is a full screen image made of 8x8 tiles. The background can have several layers (from 1 to 4) that can be scrolled independently. The video RAM is limited, so you usually have to stream graphic data from the cartridge ROM to the video RAM in real time in order to display some endless or large scrolling areas.
For the sprites, the SNES can display different sizes: 8x8, 16x16, 32x32 and 64x64 - only two of such sizes can be on screen at the same time. To animate sprites you have to manually set their position on screen and modify the graphical data that they will display, 60 times per second. To do that, like with the background, you first have to copy the graphical data (i.e. part of your spritesheet) from the cartridge ROM chip to the video RAM of the console.
The SNES can also play audio using a dedicated chip (SPC700). For input, it's quite easy to read what buttons players pressed on the SNES gamepads. (the best gamepad ever designed!)
In the end, even if you use a tool like PVSNESLib, you'll need to be familiar with how the SNES works in order to make actual games for it. Hopefully the wonderful homebrew community have consolidated some very extensive documentation. I'll recommend:
- The PVSNESLib wiki, that will guide you on how to set up the tools and how to make simple SNES programs: https://github.com/alekmaul/pvsneslib/wiki
- The NoCash SNES specs (technical, but thorough) https://problemkaputt.de/fullsnes.htm
- The SNESdev section of the NESdev forum: https://forums.nesdev.com/viewforum.php?f=12
The community is very helpful and skilled. They saved my life more than once when I was making Yo-Yo Shuriken!
Now that we have covered some basics, let's dig into some technical issues I faced.
How many enemies can we display on screen?
In a game like Yo-Yo Shuriken, the more sprites on screen (enemies, explosions, etc.), the better the game will be! However, the game cannot afford to lag. So you have to find the maximum number of enemies that the CPU can handle while keeping a smooth 60 fps display. The SNES is often touted as "slow" compared to the Genesis / Mega Drive ("Blast Processing" anyone?). And, in a way, this is true. While the SNES can display more colorful images and higher quality sound, the CPU time available is usually lower than the Genesis. In other words, the Genesis could usually moves more sprites on screen that the SNES. The best example of this difference are Contra III (SNES) and IV (Genesis). And more specifically, how each game handle explosions:
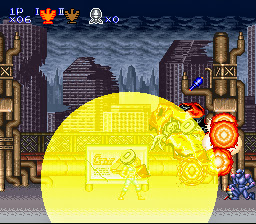
Explosion on SNES' Contra III (left) are made with a few sprites alongside a special graphical effect (transparency), while Genesis' Contra IV (right) renders them with an insane amount of sprites on screen. When programming each console like they are meant to be, directly in assembler, you can feel this difference in processing power. But when using a C compiler like I did for Yo-Yo Shuriken, the difference becomes even more obvious. So the total number of enemies I could display was limited by the CPU time available. But the CPU tasks are not limited to sprites management. It must also handle animations, upload graphical data to the video ram, manage collisions, read controller inputs, trigger sounds and music on the audio chip, etc. Developing Yo-Yo Shuriken was a constant struggle to keep as many enemies as possible onscreen, while all the other elements were eating the total CPU time available. Hence, I had to decrease the number of enemies several times as I added new features to the game.
At first, when there was only standard robots moving in straight line without collision detection, I was able to display 80 enemies onscreen (plus 1 player and his shuriken). When I added collisions detection between enemies, player and shuriken, I had to reduce this number to 40 enemies. Adding the second player, explosions, sound effects and music also took a big chunk of the CPU time available. In the end, the final game can only display up to 24 enemies onscreen in order to maintain a smooth 60 fps display rate. While it may sound little on paper, when you'll play the game you'll see that 24 enemies are more than enough to offer a though challenge, especially in the later levels of the game!
Honestly, being able to manage 38 animated sprites on screen (24 enemies + 2 players + 2 shurikens + 10 explosions) without any slowdown is still an achievement. But there is a trick behind this achievement: not all the sprites are updated every frame. Indeed, while the player and shuriken are updated 60 times per second, the enemies and explosions are updated only every two frames, and even every fourth frame in some cases. This programming trick was quite common during the 90's. It allows spreading the collision-related computations over several frames in order to display more sprites on screen without slowing down the game frame rate.
LUT makes sprites go round!
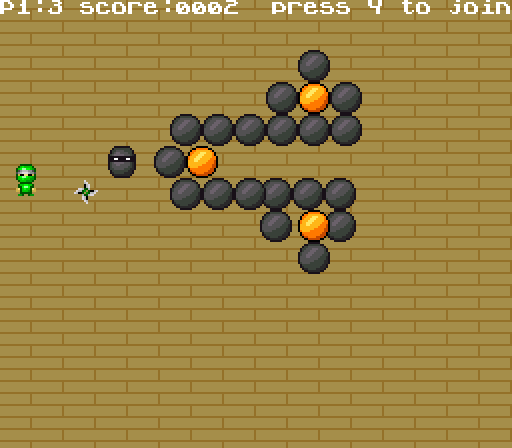
While the standard enemies have simple movement patterns, with straight or diagonal movement, the bosses move in more complex fashion. For example, many bosses have balls spinning around them.
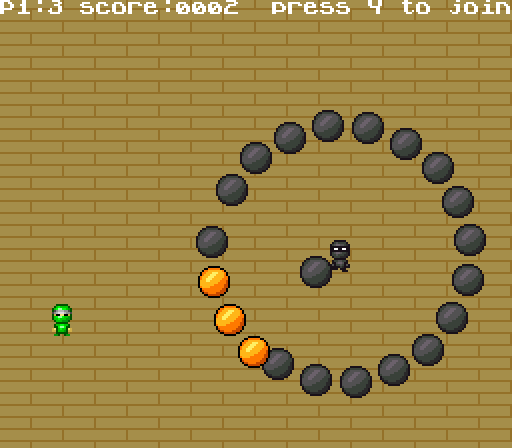
From a mathematical standpoint, you simply need to compute the sine and cosine of each ball angle to move them in a circular motion. On a modern platform, such computations are easy and fast to do. But on retro platforms, this is quite a challenge! The 8/16 bits machines CPU don't have inner functions to compute sine and cosine in hardware. So you have to compute them in software by combining a lot of more complex calculations. This obviously takes a significant amount of time. The SNES wouldn't be able to compute the sine and cosine for 24 enemies at a 60 fps rate in addition to everything else. As the balls move slowly, they are actually updated only once every 4 frames, bringing the number of calculations from 24 to 6. But in this particular case, this is still too much: the CPU can't compute 6 sine and 6 cosine every frame in addition to all the other tasks.
Of course, there is a trick to solve this particular issue, one that was also very common in the 90's. To reduce the load on the CPU, you can simply use a "Look-Up Table" instead of doing the sine and cosine calculations every frame. Simply put, I calculated the values of sine and cosine for a large range of angles in advance, using a spreadsheet program on my modern machine. Then, I stored all these values in a giant table inside the game ROM. That way, the CPU can now read the values of sine and cosine it needs to move the balls in the ROM, instead of wasting time to compute them every frame. This giant table of precomputed data is called a "Look-Up Table", or LUT. LUTs were very common in games made before the 32 bits era. And they are not limited to sine and cosine! Anything that is "slow to compute" on a CPU will usually be computed in advance so the results can be stored in a LUT: trigonometry, color effects, random number generation, raster scan effects, etc.
When the 32 bits consoles arrived, this issue was solved because their CPU featured hardware function to perform trigonometry calculations in a flash. Indeed, trigonometry is an essential part of any 3D based rendering. So machines like the PlayStation and the Saturn needed to be able to do it quickly and repeatedly every frame. When reading this, you might be wondering: if this is true, how can the SNES render 3D graphics in a game like Starfox?
In this case, a LUT wouldn't be enough: there are too many calculations to do. So the creators of Starfox simply added a new processor that can compute trigonometry quickly inside the cartridge: the famous "Super FX" chip! The SNES wouldn't be able to compute and display of all these 3D objects without the Super FX. But Starfox isn't the only game to use such a chip. Super Mario Kart and Pilotwings use another chip for the same purpose, the "DSP-1". Like the Super FX, it can perform trigonometry calculations faster than the SNES CPU. While the DPS-1 is only used to do calculations, the Super FX is much more powerful and can actually render polygons onto a 2D framebuffer, like the PlayStation and the Saturn do.
Watch out for VBLANK!
Once the CPU has finished to compute, it must tell the graphic chip to display the result of its computation on screen. This how any console work, whatever its release date. But the ones from the 8/16 bits era have a specific behaviour: the CPU can only send data to the graphic chip during a specific time period: the "VBLANK." But what is the VBLANK?
On a standard CRT television, the image is drawn though an electron beam that moves from top to bottom and from left to right. While the electron beam moves behind the screen to draw the image, it paints "pixels" of a specific color by using instructions from the console graphic chip. Without this graphic chip, the electron beam wouldn't know what color to paint, and thus no image would show onscreen. Once the electron beam has finished to paint an image, it reaches the bottom of the screen. It must then go back to the top of the screen to start painting a new image, using the new instructions sent by the graphic chip. The time period while the electron beam is off so it can moves back to the top of the screen is called the "Vertical Blanking", or VBLANK.
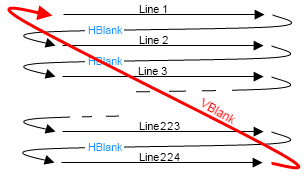
On a SNES, when the graphic chip sends instructions to the electron beam, it cannot do anything else. Moreover, you can't even modify the video memory at this time, as it contains the image to display on screen. Indeed, the graphic chip needs it to control the electron beam. If we somehow manage to modify the video memory while the graphic chip is displaying a image on screen, it would display a corrupt image, or worse. So the SNES is designed to prevent this: the CPU simply cannot access the video memory while the graphic chip is displaying an image. The CPU needs to wait for the VBLANK period to be able to send the graphical data of the new image to display onscreen in the video memory. And this period of time is quite short.
So, what are the actual consequences of all these VBLANK related limitations? Simply put, it's another harsh limitation on the total time available for game developer to display their game onscreen. First of all, to prevent the game from lagging, you need to perform all the gameplay calculations (collisions, movement, animations, etc.) between two VBLANK periods. If the game code takes more time to compute, you won't be able to display the resulting frame on time, and thus the game will visibly be lagging onscreen.
But an even harder limitation is that you can only send very few graphical data to the video memory during every VBLANK. Indeed, the graphical data transfer speed is limited by what is called a "bus". The "bus" is the actual electronic line connecting all the chips together. If you try to send more data than what is possible to transfer during the VBLANK period, the additional data will simply be cut off and not displayed.
A vicious bug: the 50hz/60hz trap!
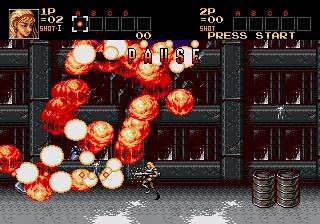
I experienced the VBLANK limitations first-hand while making Yo-Yo Shuriken. It was the cause of the one the most vicious bug I encountered during the whole project. During beta tests, using the ZSNES emulator and my own console, everything was displaying fine. But, when I tested the game on other emulators that are known to be more accurate than ZSNES, namely SNES9X and Higan/BSNES, some sprites weren't displayed. More specifically, the explosions were "cut" as you can see in the images below:


ZSNES and my console (left) / BSNES-Higan (right)
For weeks, I tried to solve this issue, without success. I was finally able to fix it thanks to the help of wizards from the SNESDev forum. the SNESDev community helped me more than once during this project, and I couldn't be more grateful for all the help they provided! They found that the cause of this issue was simply that I was sending too much data to the graphic chip every frame. The time needed to transfer all the data was exceeding the VBLANK period. So the explosions animation didn't have the time to reach the graphic chip before the end of VBLANK, and was simply cut off. But you may wonder: why was this bug only happening on some accurate emulator, and not on the real console?
This is where the bug becomes vicious. As all SNES lovers living in Europe, my childhood console works in "PAL" TV format, running in 50hz. In other words, the graphic chip of the console displays a new image onscreen 50 times per second. In the US and in Japan, the TV format is different: it's "NTSC", running in 60hz. Thus the NTSC consoles display a new image on screen 60 times per second. Does it means that American and Japanese games run faster than European ones? Sadly, yes! (but we didn't knew it during the 90's...). Ask any fighting game fan, and they'll explain you why the NTSC versions are better to play: faster, smoother, no black border, etc.

Nevertheless, the PAL format does have one advantage over the NTSC one. As PAL TVs displays 50 images per second instead of 60, the electron beam moves slower. Therefore, the VBLANK period is longer on PAL consoles than on NTSC ones. So you can transfer more graphical data every frame on a PAL console compared to a NTSC model. And this was the root cause of my bug. When I tested the game on my childhood console, running in 50hz, the explosions sprites were perfectly displayed because the VBLANK period was long enough for all the data to transfer correctly. But on BSNES/Higan, an extremely accurate emulator running in 60hz, the sprites were cut off as the VBLANK is shorter, and all the data couldn't transfer in time. But why does ZSNES, also running in 60hz, did display the sprites without issue?
Well, simply because ZSNES is an older emulator, with less accuracy when it comes to reproducing all the technical limitations of the SNES. For instance, ZSNES doesn't prevent you to modify the content of the video memory outside of VBLANK - a major technical difference compared to the real console! In the end, this issue proved me how important it was to use accurate emulators when developing homebrews, and that nothing can replace testing on actual hardware, and on all the hardware versions. So I did have to buy an extra SNES running in "60hz" to be able to test the game more thoroughly!
Going physical: making cartridges
To me, an homebrew project isn't completed until players are able to put an actual cartridge of the game in their own childhood console. But how can we create a physical release for a console that the sole cartridge manufacturer, Nintendo, have ceased production about 20 years ago?
The answer is simple: you have to manufacture them yourself! For this part, I partnered with an electronics wizard named Catskull, who already designed cartridges for my Game Boy games. For this project, Catskull designed a new SNES PCB from scratch. He used new components only, namely Flash ROM. All the cartridges are built by hand. Here is a detail of the full assembly process with pictures:
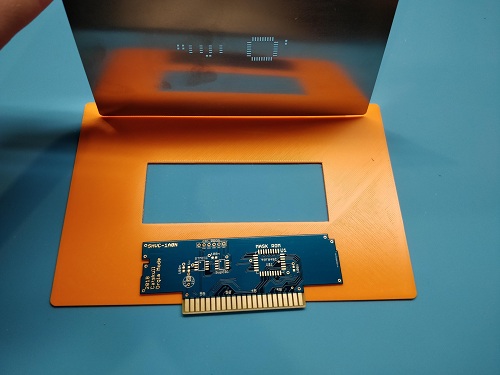
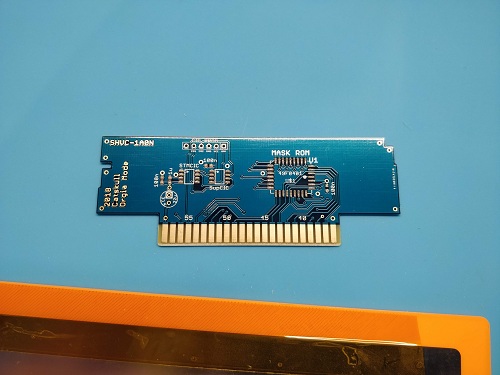
1) Bare PCB
Let's start with the beginning: the bare PCB. Catskull have the PCBs professionally manufactured. He receives them "naked", as shown in the picture below:
2) Applying solder paste
To add components (i.e. electronic chips) to the PCB, you first need to apply the solder paste. It's a "glue" that will tie the chips onto the PCB. This is a meticulous task. Catskull uses a mask to apply the paste to the required areas only:
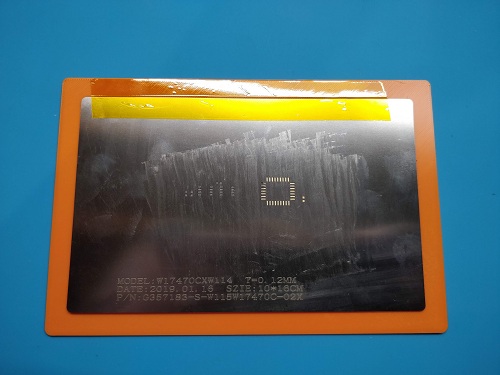
As a result, the PCB now have paste on all the part that will host components:
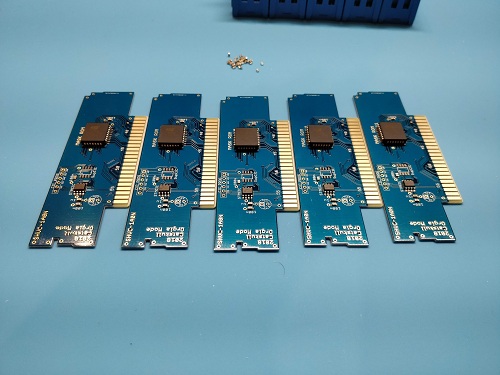
3) Laying down components
This is another meticulous task. All the components (chips) must be placed on the PCB. Catskull builds 5 PCBs at a time (you'll see why in the next step). Here are the PCBs without components:
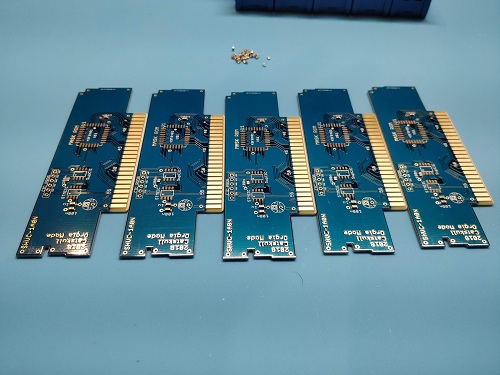
And the same PCBs with all the chips laid down where they belong:
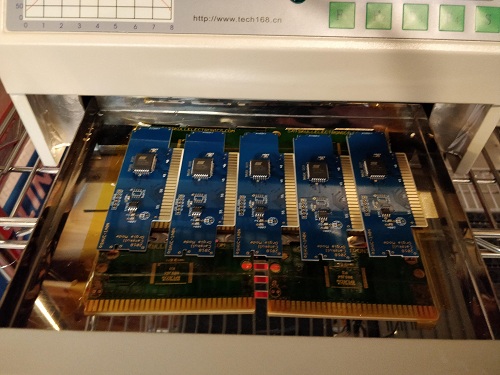
4) Baking cartridges!
The solder paste is like a cement for electronics chips. When applied, it's still "wet", so you can reposition the chips if needed. To finalize the PCBs, you need to dry the paste with an oven. So technically, the last step of the build process is to "bake" the cartridges:
5) Flashing the game ROM
Now that the electronic circuit is ready and working, we can write the game ROM onto the memory chip. To do this, Catskull uses the wonderful INLretro Dumper-Programmer by Infinite NES Lives. For those who don't know him, Infinite NES Life is another electronics wizard who created many hardware components for NES and SNES. He published several high profile NES homebrew, he's sponsoring the annual NESDev competition, and he sells NES and SNES PCBs and carts for people who want to produce homebrew: http://www.infiniteneslives.com
Both Catskull and I would like to thanks a lot Infinite NES Lives for his support on this project. First of all, he helped Catskull to fix the PCB pinout. Then, he added support for Catskull PCB on his flasher, so we could use it to manufacture our game. And, last but not least, he supplied us with the CIC chip that is required to build cartridges that can boot on original consoles! So thanks to INL, Catskull can now easily transform his hand-assembled PCB into a working SNES game cartridge running Yo-Yo Shuriken:
6) Housing the PCB into the shell
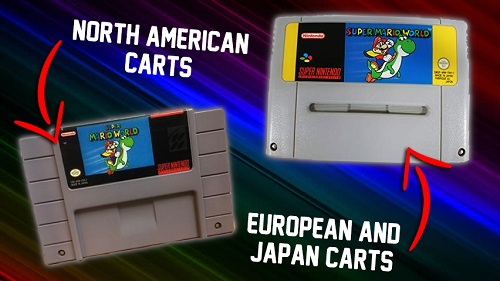
To complete the cartridge assembly, Catskull puts the PCB inside a cartridge shell. As you may know, the SNES commercial releases from the 90's had two cartridge shells variants. The Japanese and European ones had rounded edges, while the US ones were a bit larger and more rectangular. Of course, you can't plug a Japanese/European cartridge in a US console, and vice-versa.
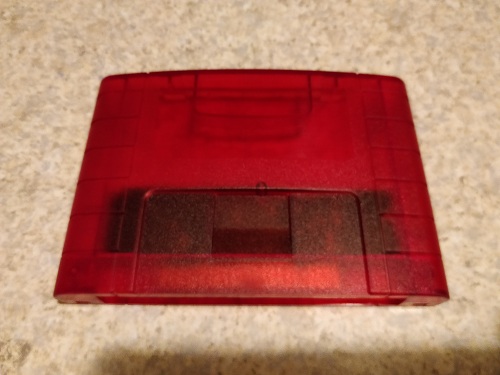
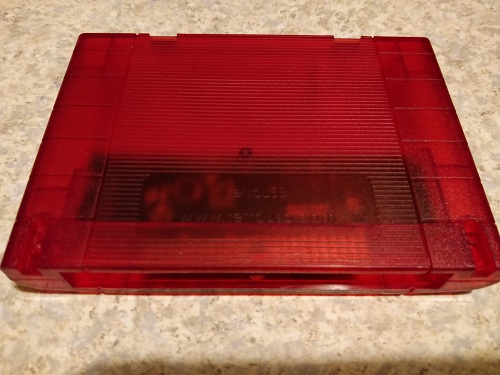
For Yo-Yo Shuriken, we wanted to make a single worldwide version. So we had to use a shell that could be plugged into both consoles variants. Luckily, there are people who designed "universal shells" that can be plugged into all consoles models. For example, you can easily find such shells in China for a low price. But we wanted higher quality materials. Hopefully, Catskull managed to find an US-based supplier who designed his own universal SNES shells, made with a high quality plastic. These shells obviously cost more, but when you have them in hand they offer a nice "sturdy" feel, like the original cartridges. This justified the extra cost in our eyes. Moreover, those high quality shells also bring a unique touch to the Yo-Yo Shuriken release: they are only available in red color. While I was surprised at first, I now find it very cool as it's a nod the bright red eyes of the numerous robots enemies in the game! Here are pictures of these shells (front / back):
Of course, the cartridge shell also needs a label with the game name applied on it, but we'll see that step in the next section. To end this rundown of the PCB assembly process, here is an issue that Catskull faced when making the first unit:
"The one thing is that SNES PCBs have their components on the rear side (facing away from you when it's in the console). So in all those pictures, I'm working on the rear of the PCB. The first one I accidentally plugged in backwards in the console because I didn't have it in a shell, and it fried the components on the PCB!"
Going physical : making boxes and manual
Having a PCB is only the first step towards a full cartridge release. These PCBs needs to be housed in shells, with a neat label, and packaged into a beautiful cardboard box with manual. While Catskull was busy designing and hand-assembling the cartridges, I designed the cartridge label, manual and cardboard box myself.
Cover art
I'm far form being an artist. But one of the pleasure of amateur / homebrew project is doing as many things as possible yourself! So I fully embraced the "amateurish" side of this project, and I decided to draw the covert art myself! I started by doodling on paper:
Then I scanned this doodle and I redraw it on the computer using a vector drawing program:
Once the covert art was done, I used it to design the cardboard box, the manual and the cartridge label. The final version of all these elements are professionally printed in the US. But during the design phase, I had to print the prototypes with my own means!
Manual
For the manual, I used commercial games releases from the 90's as reference, in order to produce something as authentic as possible. But we made some compromise as we wanted to produce a single version for all the countries (no US/Japan/Europe variants like the old days). The end result is a mix of US and European design style from the 90's. For example, most US releases had black boxes and manuals, while the European ones used a colored background. Here are sample pages from the manual:
Box
For the cardboard box, I also used a mix of European and US design, with the same color as the manual. I had to print prototypes with own means to be sure that the size was right. For the manual, I could easily print it on my own printer. But for the box, it used an A3 paper size. I also had to print the box on cardboard to be able to build it. So I went to a local print shop in my neighborhood to print the box on a A3 cardboard sheet. Then I went back home to build it. I had to make several versions before getting the exact size of an original SNES game from the 90's, but I finally made it. Here is a picture of the last box prototype:
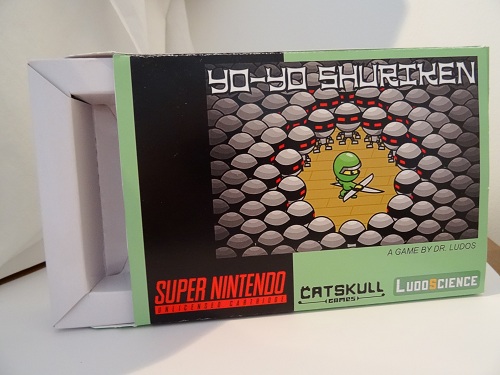

Once the box prototype was completed and validated by both Catskull and I, we found a supplier in the US that could build them using professional materials. We were very happy to found a supplier that could print the boxes on a cardboard material close to the ones from the 90's. If you open a Yo-Yo Shuriken box, you'll see that the inside is gray/brown, like the 90's releases, and not white like most retail cardboard stock. Each box is actually printed and hand assembled in the US by our supplier (a two-man operation), who ships them already assembled to Catskull. Catskull then adds in the manual and the cartridge, to obtain the final physical release of Yo-Yo Shuriken that can you see here:

Closing words
In the end, with all these steps, making Yo-Yo Shuriken took almost 2 years of hard work! I hope you enjoyed reading this article. It was quite a journey for me, and I'm happy to share it online with the hope that it will inspire and motivate other developers to make new SNES games!
If you want to play Yo-Yo Shuriken on your own console, or simply support my work, you can buy the beautiful boxed cartridge release directly from Catskul Games:
https://catskullgames.com/yo-yo-shuriken
If you prefer to play it on emulators, you can buy the ROM version from here:
https://drludos.itch.io/yo-yo-shuriken
If you enjoy my work and can afford it, you can support me financially on Patreon. My games usually end up being released as freeware online, while some of them are also sold on actual cartridges. By supporting me on Patreon, you'll also gain an unique access to the beta versions of my games, and even to the various prototypes I create (including cancelled projects):
https://www.patreon.com/drludos
If you simply want to be notified of my latest games and articles releases, you can sign-up to my newsletter (I only use it to announce games and articles releases, so except about one email every 1-2 months at maximum).
Comments
Log in with itch.io to leave a comment.
By the way, can I ask what kind of unit sales you achieved (hopefully you're not sensitive about this stuff)?
I'm in the process of mocking up a SNES game myself, with the ideal end-goal of releasing it as physical game too, and I'm just curious about the potential numbers of people out there who will actually go out and buy it.
Hi again!
I'm happy to hear that you have a SNES project in the work too! The SNES needs more and more homebrew titles, so I'll be happy to answer your questions on this topic too. You can contact me directly through email: drludos AT ludoscience DOT com
Great, I've sent you a message. It will come from kirk_johnston AT hotmail DOT com.
Also, you can check out some early test footage of the SNES game idea I'm working on here: Mode 0 Test
If you are saying there are the 24 enemies PLUS the 10 explosions onscreen then I think you made a design/programming error there because the enemies should change into the explosion sprite when they die so there's never a higher number than 24 sprites/explosions onscreen at once. Or at least I imagine that would be a good way to do it in order to reduce the amount of sprites onscreen at once. Did I get you wrong there?
Hi, thanks for feedback!
Your analysis is right, in many games you usually recycle the enemy sprite to make an explosion, and reduce the total sprites count . But for Yo-Yo Shuriken, it wasn't possible, because when an enemy is killed, its sprite is reused to display a coin (or a bonus). The enemies always drop a coin or a bonus, because it's the only way to score points in the game.
So I had to use an extra set of hardware sprites to display the explosions :). It was more convenient because killing an enemy can now trigger more than one explosion at a time (like with the bosses).
So yes, for this game I do have up to 24 enemies (16x16 pixels) + 10 explosions sprites (32x32 pixels) on screen.
Ah, ok. That makes sense.
In a part of the blog you said that SNES doesn't have inner functions to compute sine and cosine, and I'd like to know what did you use to replace those
Hi!
Good question! Like every other programmer, to replace sin/cos I simply used a Look-Up Table (LUT), that is a big table with all the sine / cosine values precalculated (See "LUT makes sprites go round!" section of the making of).
If you want to see an example on how to use this for a SNES project, you can check the source-code of my other game "The Last Super"
=> download game and source code from here: https://drludos.itch.io/the-last-super
=> Open the file "TheLastSuper.c" and go to line 222 for the LUT table itself and line 2549 for an example of how I set X/Y position of a sprite using those table.
Hope that helps!
I have a question: How do you skip Nintendo's anti-piracy chip?
We simply use an open-source alternative chip that replace the CIC chip. The most common one is the SuperCIC (https://sd2snes.de/blog/cool-stuff/supercic) that you can flash onto a wide variety of chips (depending on your PCB). This is the chip that is used in the SD2SNES / FXPAK flashcart.
For this particular release, we simply used Infinite NES lives's Multi-Region CIC (http://www.infiniteneslives.com/snessupplies.php), that works very well too! They will be already installed on a blank SNES cart if you buy them from Infinite NES Lives, but you can also buy the chips separately like we did to mount them on your own PCB if you choose to go that route :) .
Hey, wouldn't it be a Good idea to do a tutorial on how to créate a game for snes?
Maybe someday :) (I need to find the time to do so!)
In the meantime PVSNESlib wiki is a great place to start: https://github.com/alekmaul/pvsneslib/wiki
Oh, and in a few days, I'll release a new (smaller) SNES game, this one will be open source (with lots of comment) if it can be useful to you!
in fact, I am a beginner in this vast world of programming, and I wanted to know how to make one just to experiment.
Thanks for the answer, I will be looking forward to the new game.
Hi!
SInce your first message, I've actually released the game I was announcing in my previous post: The Last Super
You can get the game (freeware) and the source code from here: https://drludos.itch.io/the-last-super
PVSNESlib have been updated a lot too, they added some new cool features (like support for huge maps)
Ok
Wow, thank you for all this content !
I have some, maybe obvius, doubt.
¿Why that difference between Europe and the rest of countries in terms of Hz(PAL/NTSC) ?
And, I'm sure you are an artist, maybe not a drawing artist, but sure other type of artist. That post is the prove.
Thanks !
Hi, thanks for the kind words and I'm glad you enjoyed the article!
To answer your question, the European releases from the 8/16 bits era are in "PAL" format, so all the game play at 50hz or 50 fps. While for the USA(+Canada) and Japanese releases, they are in "NTSC" format, so their game plays faster at 60hz / 60fps.
For more detail per country, here is a detailed map showing what TV format was/is used in each country:
https://en.wikipedia.org/wiki/File:PAL-NTSC-SECAM.svg
The NTSC (green) is for 60hz, while the PAL (blue) and SECAM (orange) are for 50hz.
Thank you one more time, then !
This was an awesome and extremely informative read! I've been mulling over the idea of getting into homebrew and this was the kind of information I've been looking for! Thank you so much for this post. I've enjoyed Keep SNES Alive! and your GB games. A physical copy of Yo-Yo Shuriken is definitely on my wishlist.
Thanks a lot for your comment!
I'm glad you enjoyed the article, and I hope you'll enjoy the game too! :)
If you're looking for more information about making homebrews, I can recommend you to read 2 others similar articles I made about making a game for the Game Boy and the Mega Drive :
- Making a Game Boy game in 2017: https://www.gamasutra.com/blogs/DoctorLudos/20171207/311143/
- Making a Genesis / Mega Drive game in 2018: https://www.gamasutra.com/blogs/DoctorLudos/20191019/352537/Making_a_SEGA_Mega_D...
You can also read Nathan Tolbert blog on making NES, Atari 2600, GBA and NDS homebrew:
https://anguna-dev.blogspot.com/
And to see the latest homebrew releases, the VideoGameSage forum is wonderful:
https://www.videogamesage.com/forum/22-share/
Wow dude, thank you so much!
Really enjoyed reading this! Cool to know that people are still making hardware today to run games on a console from the 1990s. I wish I had the time and dedication to make a SNES game all the way from digital to physical but I think reading it about it as close as I'm going to get :)